Focus Bulacan Online
  • Home
  • Contest
    • Page of Fame
  • Feature
  • About
    • Rules & Regulations
    • Membership Retention
  • JOIN

INSIGHT

KNOWLEDGE IS MOST USEFUL WHEN SHARED.

Check here for our workshop or tutorial offerings.

How It Was Done : "Balance" Winning Photo

8/10/2016

Comments

 
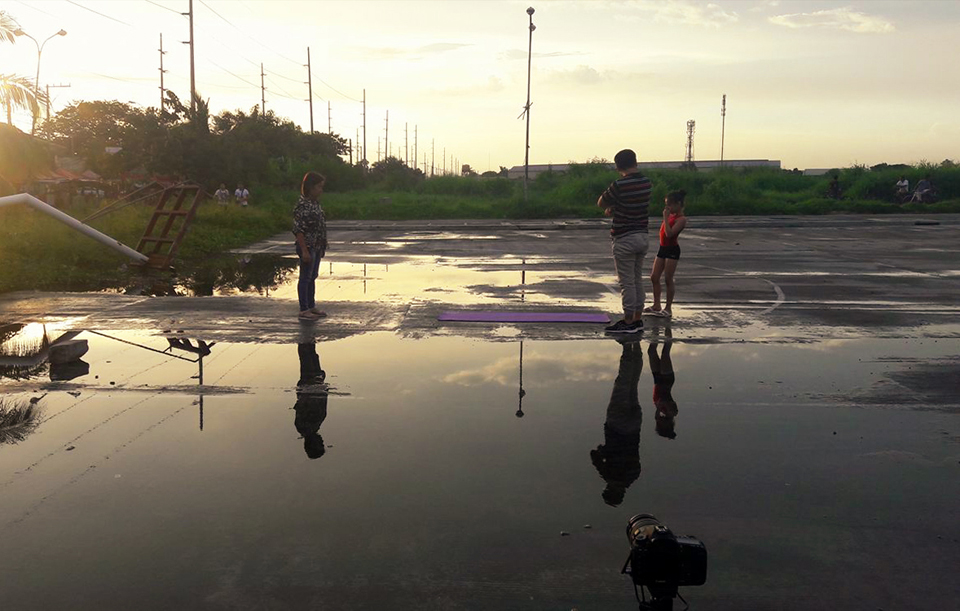
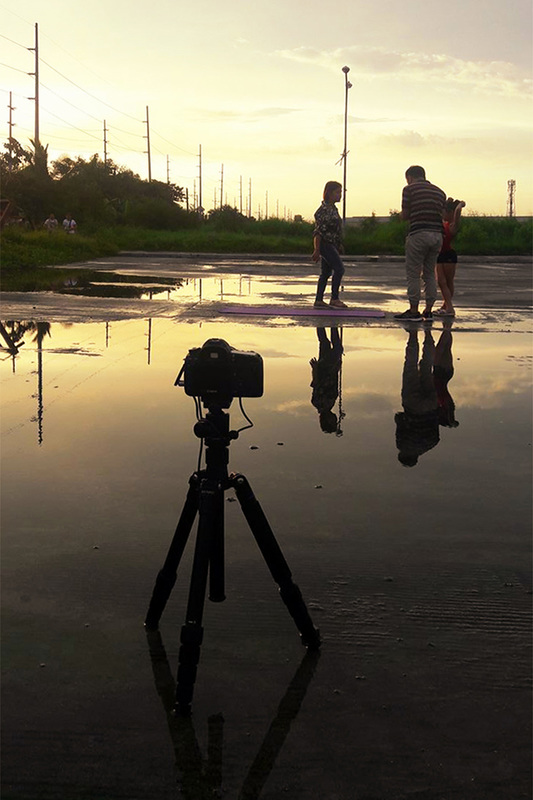
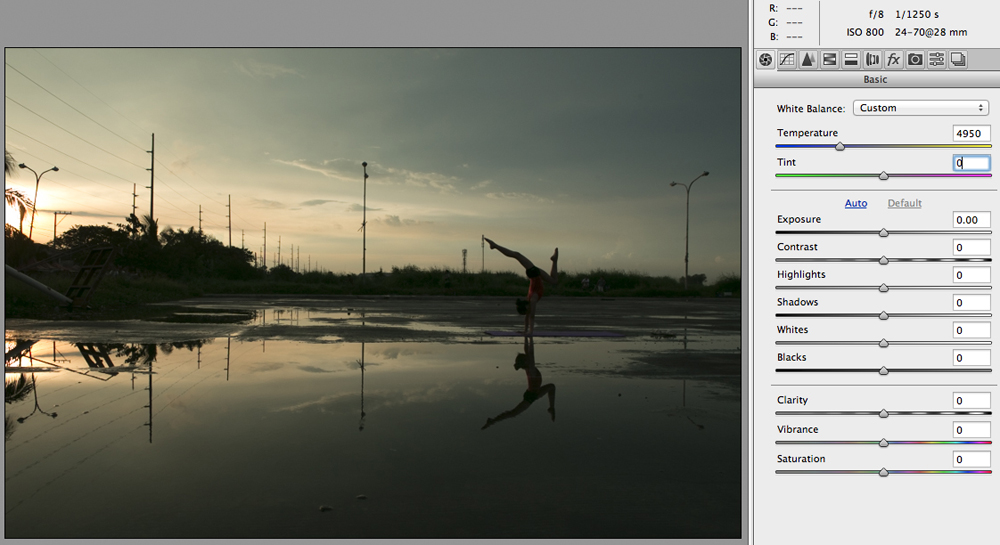
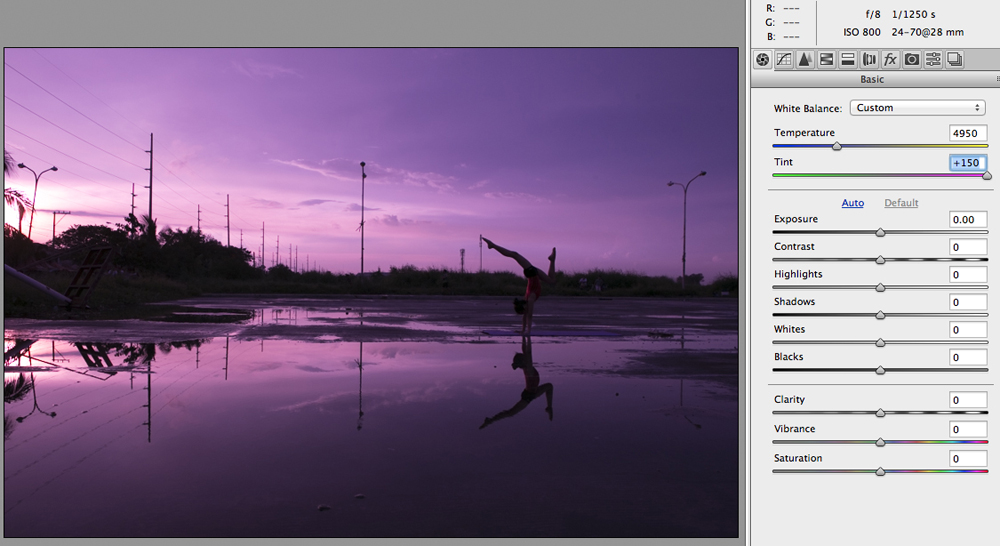
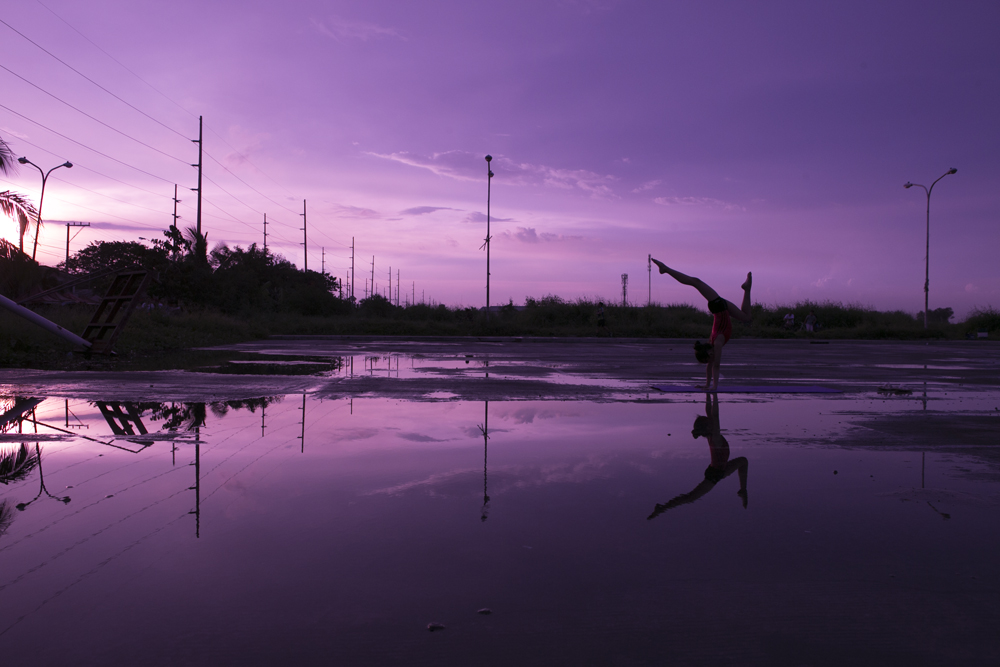
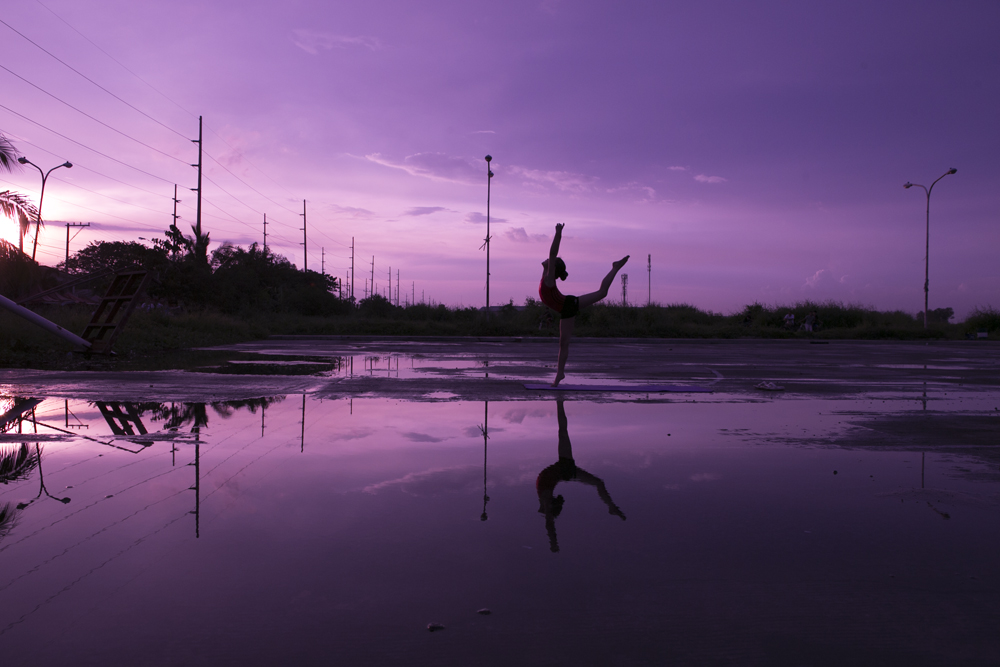
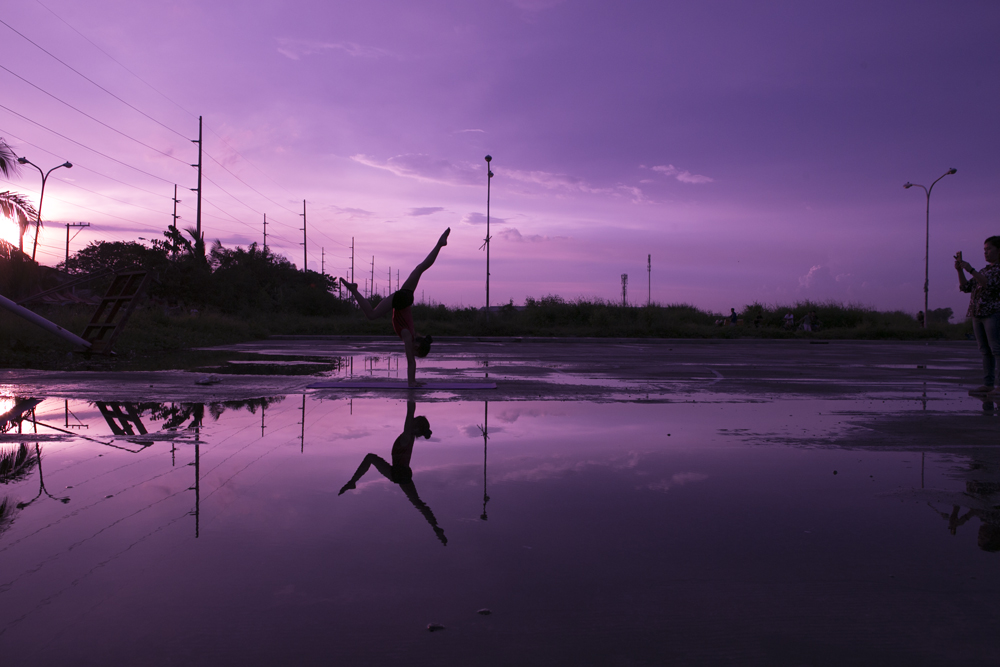
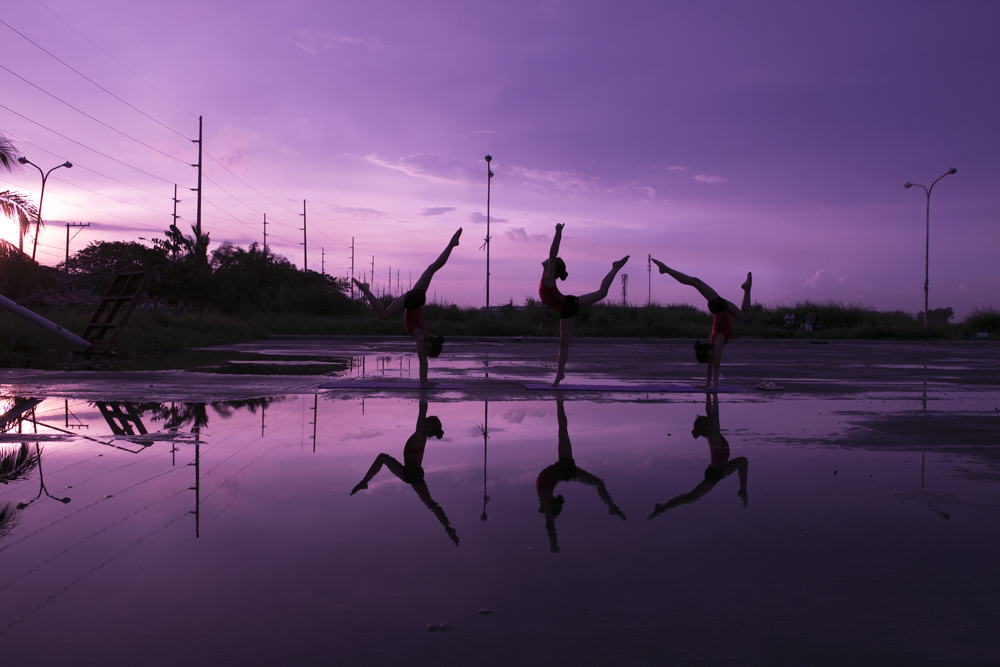
After emerging victorious in our Balance theme contest and getting his fair share of questions how and where he shot his entry, Focus photographer Jer Sandel shares the story behind his winning photo.

By JER SANDEL
I've been getting a lot of questions about my photo entry to Focus Bulacan's "Balance" theme contest. I'm happy to have won the contest, even happier that I'll get to share how it was done. It's not as complicated as it seems.
Picture
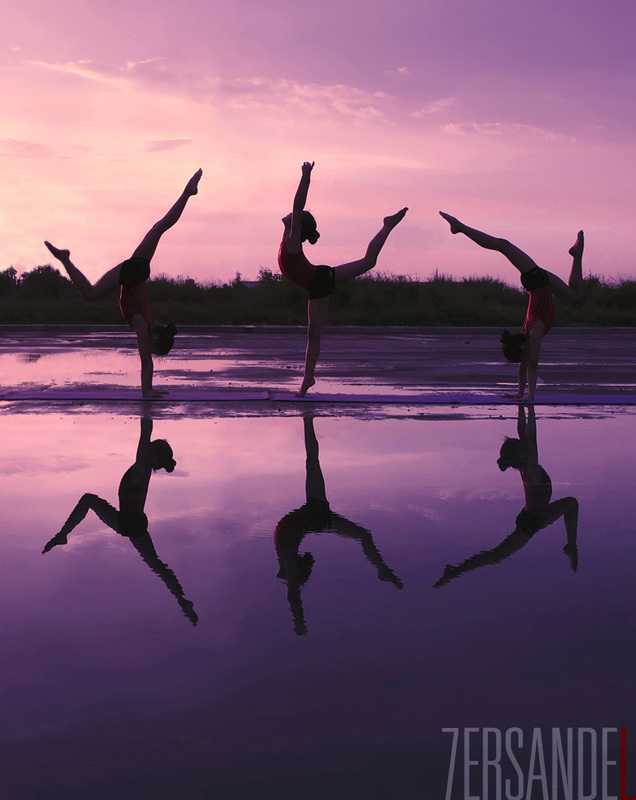
Jer Sandel's winning "Balance" photo


Conceptualizing

The first thing we do, of course, upon learning the contest theme, is to conceptualize our entries. I actually entertained three ideas for "Balance". The first was a photo featuring the yin yang symbol, because as we all know, it connotes balance. I was thinking of arranging white sugar and black coffee into an intricate yin yang design, and photograph it in a top shot. The photography part was easy, it was the subject styling that made me consider another concept. So I did. The second idea that I wanted to do was a model doing a headstand. I always thought of headstands as cool and difficult and my appreciation for it stemmed from my admiration for the UP Pep Squad over the years. But then I thought, how could I present it dramatically? And the model that I thought of wasn't really confident in posing for me because she was still perfecting her headstand execution.

So, finally, I moved on to the third idea, and this one I knew I could pull off : a gymnast and a ballerina doing a difficult pose against a sunset background. A silhouette "balance" photo. That was the plan. The question now was : who would do the poses for me? I didn't personally know of a gymnast or ballerina.
Picture

Enter Sir Toti Villanueva of the Malolos City Sports and Development Office. He knows a lot of athletes from different disciplines, especially those based in Malolos or nearby Bulacan towns. I was confident he could find me a subject for my shoot. He didn't disappoint - half an hour after I messaged him, he gave me two names, one of a gymnast's mother,  the other, of a ballerina. To cut the story short, I got my subjects, and they told me the poses I wanted were doable for their daughters. We then scheduled the day and time of the shoot.
Picture
The shoot location... after it rained. Explaining the shoot to gymnast Sam and her mom.


Photoshoot

Then the problems crept in. On the night before the shoot, my ballerina model had to beg off because of an unforeseen conflict with her school schedule. Logistically, it wasn't possible for her and her mom to go to the shoot location. I understood... thus I had to think of a way to get the shot that I wanted. Then, to compound matters, in the afternoon two hours before the shoot, it rained. The shoot location being outdoor, I had doubts our plan would push thru.. a sentiment shared by the gymnast's mom. In my mind, I was talking to the rain : I don't care if you're just a drizzle or you pour out hard, but you have to stop by 5PM (our call-time for the shoot). It was an illusion of control but more of a helpless wish. The contest submission deadline was two days away and my schedule wouldn't allow me to set another shoot. It was this day or nothing. Shoot or bust.

When I arrived at the location - the parking lot of Malolos Sports and Convention Center (again, thanks to Sir Toti) - gymnast Sam and her mom Cecilia were already there. I surveyed the scene and looked for puddles of rainwater. I found a large one just in the location I wanted it to be - against the sunset backdrop I was planning to feature.

Remember the silhouette peg I had in mind? Well, we were going to do just that, but this time with an added element - water reflection. We didn't expect it would rain but the rain suddenly gave me an extra element to incorporate in my photo. After explaining to Sam and mommy Cecilia how we were going to do the shoot, I only had to look for a spot and angle that would best feature the silhouette poses. I also wanted to create an illusion where the foreground would look like a water reservoir... not just a rain puddle.

(See photo below : I used a low angle for the camera on a tripod. Just enough elevation to see the subject's body outline, while low enough to create the illusion I wanted.)
Picture
Camera on a low angle and fixed on a tripod


So with everything set... it was time to shoot. I had only one model to work with, Sam, but I placed the camera on a tripod for a specific reason : I was going to take multiple photos of her - in different spots and positions - and I'll blend the photos together in Photoshop. The crucial thing was - her poses shouldn't overlap so I could blend the photos seamlessly in post-processing. Also, I didn't want the clouds to move too much (again, for that seamless look), so we had to do the shoot quickly. Do a pose, shoot it, re-do it just to be sure, shoot it once more, then move on to the next spot and pose.

Luckily for me, Sam performed like a professional. Well, she's been training regularly for two years, maybe that's why. I was hesitant at first in showing her the poses I wanted, but each time I showed her, she would just smile back, as if telling me, "that's easy." She did make it look easy. In all, I had Sam do four different poses (in four different spots). But in post-processing, I decided three poses would look better. Always odd, never even.

Post-Processing

No magic. Just a few tricks. I always shoot in RAW. I love the control it gives me to correct certain settings, and also room for creativity. While I had a yellow silhouette peg in mind, what I wanted for my photo was something more relaxing to the eyes. And since I was working with a female subject, I also wanted a feminine color.

(Below is the RAW photo, straight from the camera, still untouched.)
Picture


The exposure was spot-on for me. What I played with is the white balance tint (see the slider pushed all the way to the right) so the photo would have a pink and purple look. Like I mentioned above, I wanted relaxing and feminine colors. It took just one slider adjusment to achieve it.
Picture


Here are the three individual photos that I blended together. I had Sam start from my right and move on to her next spot to my left. No overlapping. She moved her mat with her.  I also blended together the mat.
Picture
Picture
Picture


Blending was done the simplest way : put one photo on top of the other (as a layer), create a layer mask, then brush on the layer to combine the two photos. After blending the three photos that I showed above, the result was this photo below. As you could see, it's far from perfect. The shot was too wide and showed a lot of distracting elements. So I cropped it and went for a portrait orientation instead.

The next step - and the most difficult one - was to clone out the poles and power lines from the background and water reflection. I didn't want those distractions in the photo. I wanted the viewer to focus on the gymnast/s, the shadows, and the reflection.
Picture


Finally, I adjusted the white balance once more, gave it a warmer look, so the pink color stood out more. The final result was a pink sky and purple reflection - which showed a "balance" of its own. Then of course, there was balance in the difficult poses... and finally, balance given by the water reflection. I contemplated on presenting the photo sideways (the left side being the reflection, the right side the real-world), but decided against it : the photo had a strong appeal on its own because of the simplicity, so why make it complicated to look at?
Picture


Again, my thanks to Sir Toti Villanueva for the connections, the location, and even the behind-the-scene photos. To ma'am Cecilia Yacob and awesome Sam, thank you for the help and cooperation. I feel sorry we didn't get to take a group picture after the shoot. Finally, thanks to everyone who voted for my entry.

One model. An empty parking lot. And rain.

To God be the glory.

Comments

    Inform & Inspire

    Tips, advice, and hopefully helpful information from our members intended to speed up the learning curve of photography beginners.

    Let's fill the world with beautiful photos!

    Archives

    August 2016
    July 2015
    February 2015
    November 2014
    October 2014
    September 2014
    March 2014

    Categories

    All

    RSS Feed

Powered by Create your own unique website with customizable templates.
  • Home
  • Contest
    • Page of Fame
  • Feature
  • About
    • Rules & Regulations
    • Membership Retention
  • JOIN